- Home
- Classical Fingerstyle Portal
- 15 Actionable Guitar Lessons
- Classical Guitar Technique
- Guitar Lessons
- Beginner Lessons
- Guitar History
- The Renaissance Guitar
- Guitar Time Line
- Classical Guitar Blog
- Contact
- About Author
- Site Search
- Privacy Policy
- Site Map
- Classical Guitar Study Course 3.0
- Instant Classical Guitar Repertoire
- Classical Guitar Lessons For Beginners
Classical Guitar Lessons for Beginners (Step-by-Step)
This is one site you’ll find great and practical classical guitar lessons for beginners and beyond!
Classical guitar is elegant, expressive, and absolutely learnable with the right approach. This page gives you a simple path to begin to learn about classical guitar technique:
* How to hold the guitar
* How to position your hands
* How to play your first arpeggios, and even perform a few beginner-friendly pieces.
Each section includes practical tips and exercises you can try right away. By the end of these classical guitar lessons, you’ll have the foundation you need and a short repertoire of beginner pieces to get you started....
By the way, you can get some more advanced lessons (don't worry, they're fr/ee) when you join the Classical-Fingerstyle Portal...
https://www.learnclassicalguitar.com/Classical-Guitar-Fingerstyle-Portal
O.K. On with the show!
Classical Guitar Lessons - Setup and Essentials: Phase 1
Classical Guitar Lessons - Posture and Guitar Position
Classical Guitar Lessons - How to Hold the Guitar...
Start by sitting tall. Many classical players place the guitar on the left leg, sometimes using a footstool or support, which raises the neck slightly and allows for relaxed shoulders. Keep the back straight, let the guitar rest naturally against your body, and avoid leaning forward too much. The goal is to feel balanced and relaxed before you even play a note...

Classical Guitar Lessons - 'The 'Triangulation Technique'
Here’s the process:
When you sit down to play or practice you need to hold the guitar properly so that it is very securely sitting between your legs and positioned in an ideal way to comfortably play the music.
What do we call this particular type of classical guitar technique?
This is where the 'Triangulation Technique' comes in.
As the name suggests, you need to make the guitar secure in preparation for practice or performance.
Step 1:
There are 'three points of contact’ of the guitar with your body...
Namely:
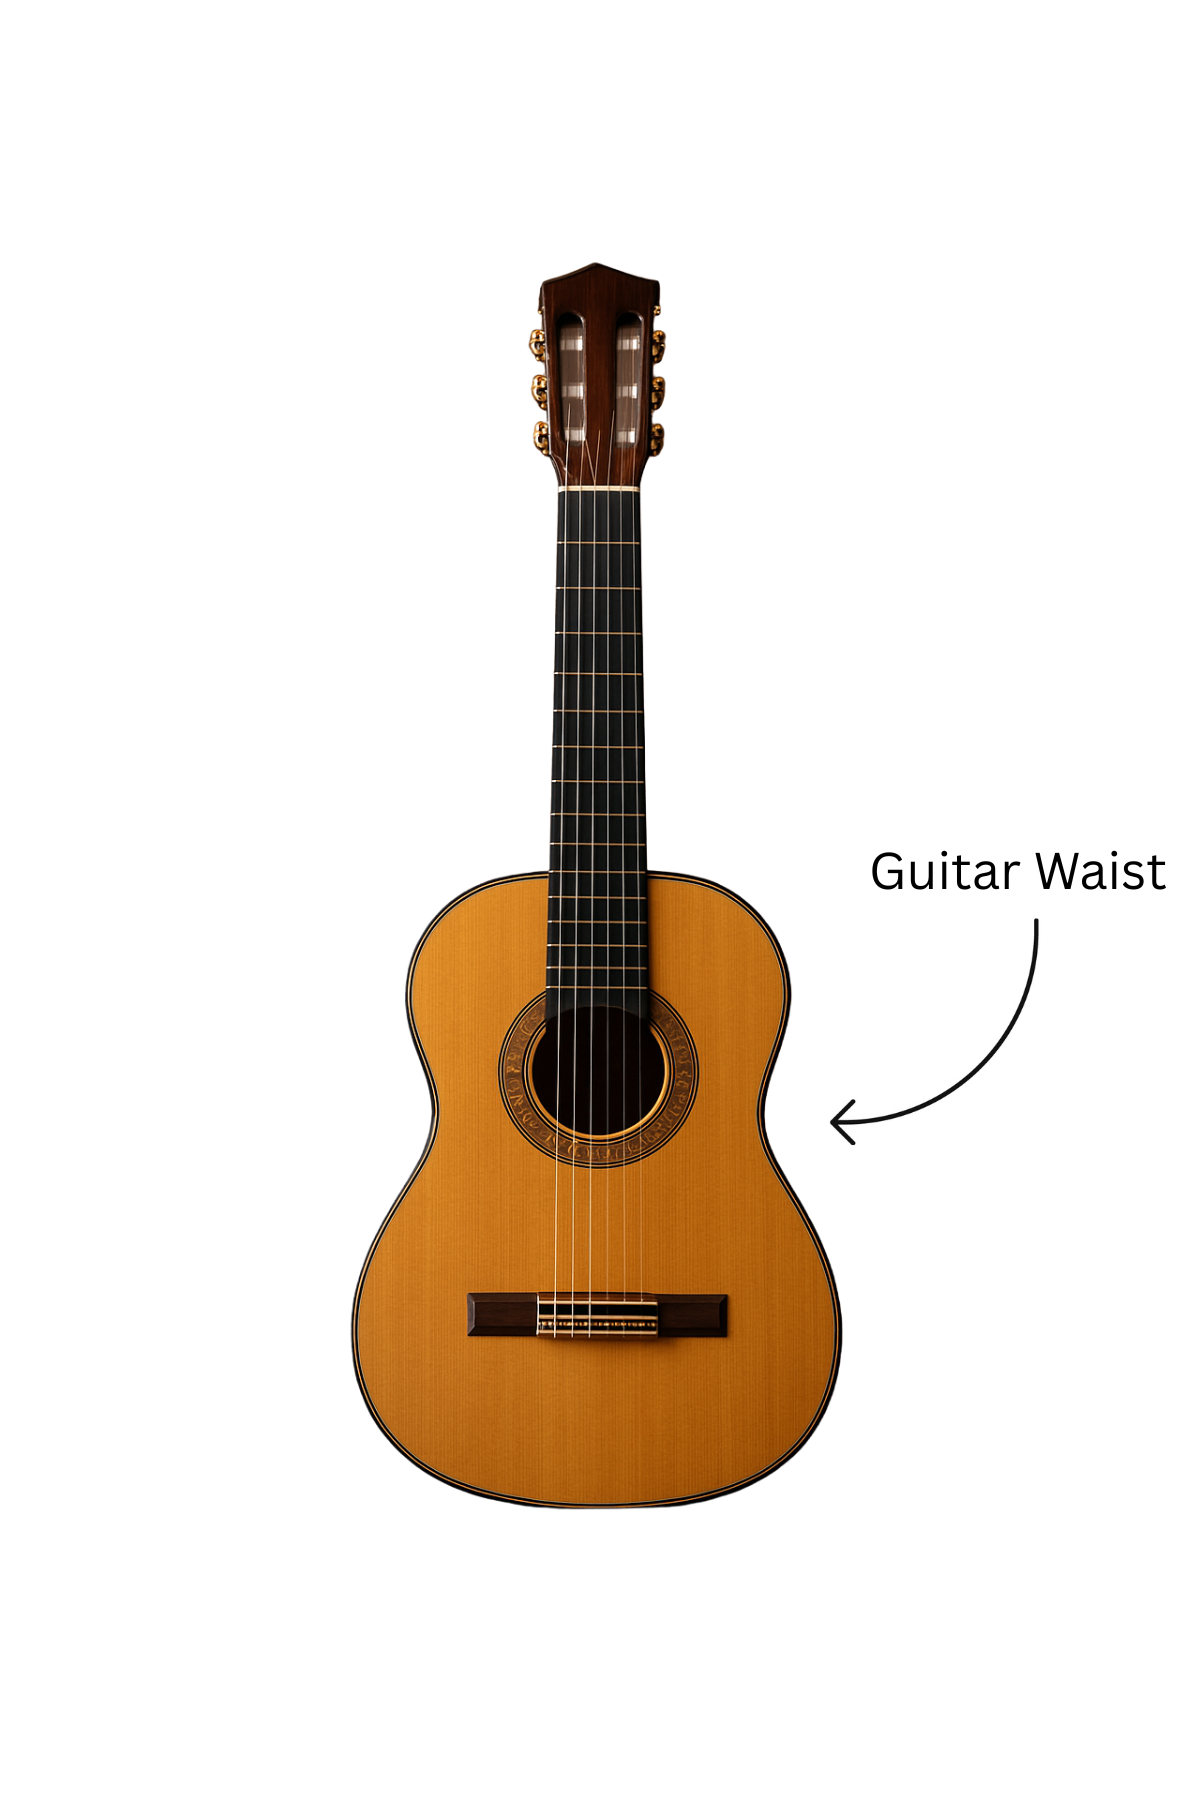
The ‘Waist’ of the guitar (between the Upper and Lower bouts) is resting on your left leg (presuming your right-handed, opposite for a ‘lefty’).
Step 2:
The base of the guitar rests against your inner right thigh.
Step 3:
The back of the guitar of the upper bout rests against your chest.
Which means?
Already, with these 3 simple steps, you have made the guitar very stable, which is an ideal place to be when you actually start playing music!
Stability Is the Key!
I remember so many times in my private teaching studio at home I would spend a large part of the first lesson with new students to make sure they could sit down and instinctively know where and how to place their guitar.
This meant they had optimal reach and comfortable positioning of their guitar which was naturally stable.
Bottom line?
I wouldn’t let the student progress until they could sit using the ‘Triangulation Technique’ BEFORE we moved on – it was THAT important!!!
You’d be surprised how easy this is to do, even for children, with a short bit of practice!
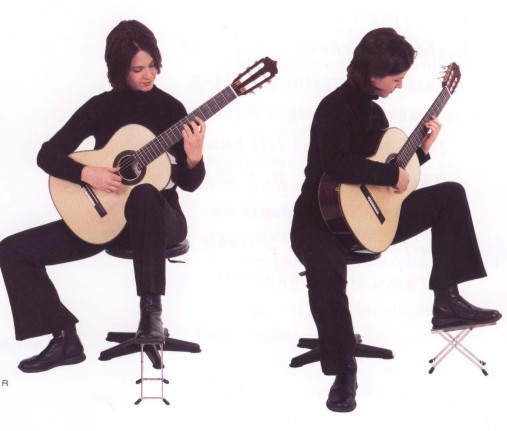
Picture courtesy of David Braid's 'Play Classical Guitar'
Classical Guitar Lessons - Line up the 18th fret with your Belly Button...
When you pick up your guitar and sit down to play, the VERY FIRST thing you should think of is the ‘Belly Button Approach’. It’s the first ‘cab off the rank’ so to speak in terms of classical guitar technique.
What do I mean?
You place your guitar in such a position that you can reach all along the fret-board with your left hand and be able to move your right hand to pluck the strings and be able to slightly move your head to view what both hands are doing.
The Belly Button Approach and the Triangulation Technique are performed virtually simultaneously and go hand-in-hand with each other.
This is a 1-Step process and is VERY easy!
The Belly Button Approach means you align the guitar with your body so that the 18th fret of the classical guitar is in line with your belly button...
I hope you have one! :))
The 18th fret is just about the last fret on the fingerboard where it meets the sound hole. See the picture below...

If you position the guitar this way, it’s like when a pianist sits down at the keyboard. It would be quite strange if the piano player sat at the far left or right on the piano stool, instead of in the middle of the keyboard (where middle C is).
Indeed, it would be hard to play most music in this position.
There would be an imbalance. It’s the same with the guitar and is the first step to a solid classical guitar technique.
If the 18th fret is aligned with your belly button, then the guitar is positioned in the middle of your body and your arms can reach easily either side to perform their tasks.
Classical Guitar Lessons - Use the 'Eye Level' Method
So, what is the Eye-Level Method?
It is this:
When you have placed the guitar using The Belly Button Approach and The Triangulation Technique the next step is to achieve The Eye-Level Method.
This is also a VERY easy 1-Step method, but it is important for overall balance and comfortableness when playing.
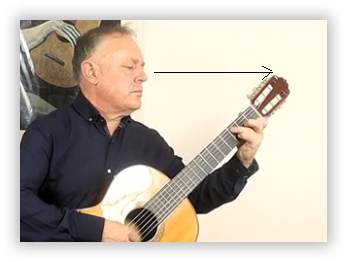
As the guitar is sitting in your lap after the Triangulation Technique, arrange the head-stock of the guitar (where the tuning pegs are) in line with your eye level. It looks like this…
Classical Guitar Lessons - Keep the ‘Arch’- Don’t Let it Fall!
The shape of the ‘arch’ in your forearm is the PERFECT shape to make to have control over your right-hand technique, which includes depressing and deploying the strings TOWARDS your tummy BEFORE releasing them after playing notes...
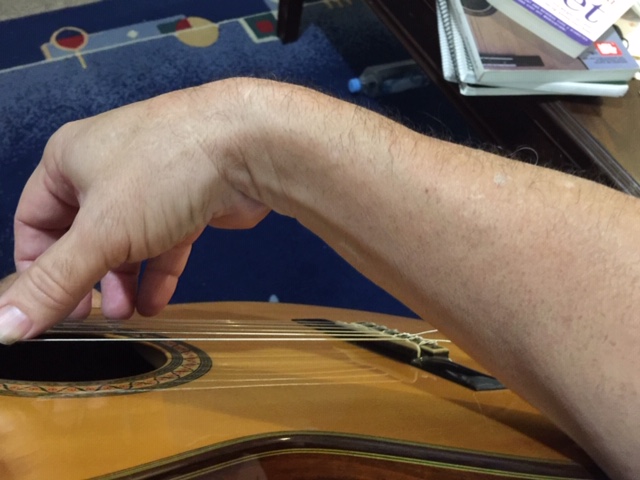
But you're probably wondering:
Why is this important in terms of classical guitar technique?
Well, if you place your forearm too shallow in relation to the soundboard, or top of the guitar, you tend to pull the strings out from the soundboard when trying to play notes.
This causes the notes to make a horrible ‘thwacking’ noise and is definitely NOT in keeping with making the guitar sound ‘dolce’ or sweet, to say the least!
Definitely NOT good classical technique!
Indeed, you tend to lose a lot of control in your right hand when you place it too shallow in relation to the soundboard.
To summarize:
Step 1:
Place the inside of your forearm (close to the elbow joint) on the ‘upper bout’ of the guitar, in roughly the middle of the bout and in line with the ‘Bridge’. The Bridge is where the end of the strings are tied and secured.
Step 2:
Let your fingers come down and touch the strings resting your thumb on the lower ‘E’ string, your 1st finger on the ‘G’ string, your 2nd finger on the ‘B’ string and your 3rd finger on the thin treble ‘E’ string (closest to the floor).
Do this WITHOUT covering the sound hole. To allow the sound to come out into the room make sure your right thumb is aligned with the middle of the sound hole. Another tick in your correct classical guitar technique!
Step 3:
Make sure you MAINTAIN the arch from elbow to fingertips!
Classical Guitar Lessons - Setup and Essentials: Phase 2
Now you're ready to start practicing some of the basic techniques...
Classical Guitar Lessons - Right-Hand Basics (Finger Names: p i m a)
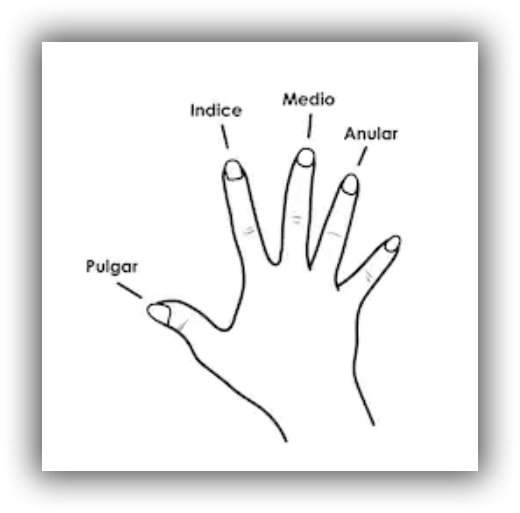
In classical guitar, the right-hand fingers are given traditional names: Pulgar - p (thumb), Indice - i (index), Medio - m (middle), and Anular - a (ring finger). Rest your forearm lightly on the guitar’s edge and keep the wrist in a neutral position, neither collapsed nor overly arched. Begin by playing open strings: the thumb on the bass strings, and the index, middle, and ring on the treble strings. Try a simple pattern: p-i-m-a, p-i-m-a, across the open strings. Play slowly, aiming for an even tone and volume.
Here's a picture of what I mean...
Classical Guitar Lessons - Right Hand: 'Tirando' and 'Apoyando'
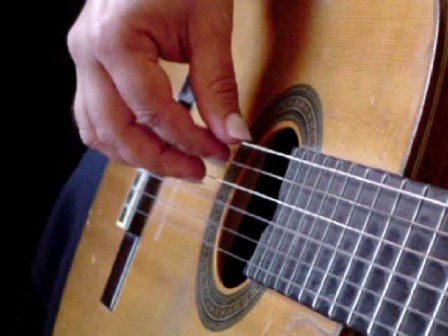
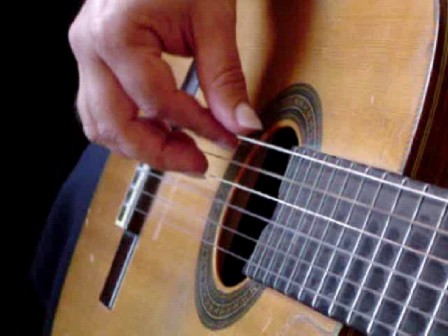
There are two major techniques to choose from to play a string:
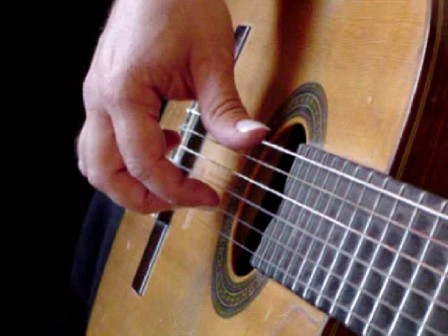
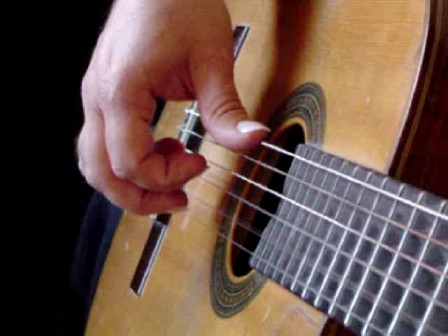
* 'Free Stroke' (Tirando) pulls the finger off the string without contacting the next one. This makes a sound that is lighter, which is great for arpeggios and chords.
* 'Rest Stroke' (Apoyando) pushes through the string so that the finger rests on the following string. This makes a rich, singing sound and is typically utilized for melody lines.
Practice moving between the two approaches on open strings until you feel comfortable doing so.
Classical Guitar Lessons - 'Tirando' preparation and execution...
 |
 |
Classical Guitar Lessons - Rest Stroke preparation and execution...
 |
 |
And if you're more of a visual/video type of person, here is a video that takes you through the 'Tirando' and 'Apoyando' process...

Classical Guitar Lessons - Left Hand: Finger Placement and Movement
In classical guitar technique we’re ALWAYS on our ‘tippy-toes’, but in our case the tips of our fingers of the left hand. The reason we use the tips is because that is the BEST way to produce a clear, full note...
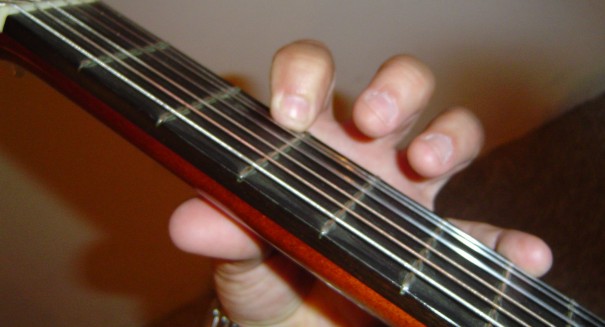
Conversely, if you use the pads of your fingers (the underside of your digits) there is every chance your note will be cut off or muted in some way. This is because the extra skin could touch the string and mute or deaden the sound. Definitely NOT good classical guitar technique!
So, stay up on those toes, sorry – fingertips!
So, if you're conscientious about your technique, you should use the very tips of your fingers on the string as you push it down on the fret board. The muting is especially problematic for the strings under your finger i.e. the strings not being fingered but being slightly touched by the skin of your finger being used to play a note.
You can achieve this fingertip control by bending your knuckles at each joint as you attempt to play a note on the string. If you looked side-on at the shape of your finger as it played a note it would look a little like the letter "C", only a little more "square".
Lastly, to achieve good left-hand guitar technique, you must finger the note on the fret board right next to the fret itself. If you play too far away from the fret, you will tend to get a really annoying buzzing sound as you play the note. If you play right on top of the fret you will tend to get a muting sound which is also not conducive to good music making.
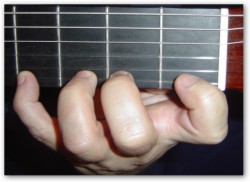
Let's do a little practice now of the left-hand fingering of the notes.
Here’s how it works:
Step 1:
Place your first finger fingertip on the ‘F’ note on the first fret, 6th string. Using an alternating ‘i’, ‘m’ pattern play the first 4 frets of the guitar.
Next play the open ‘A’ string followed by the next 4 frets on that ‘A’ string. Continue doing this until you get to the 4th fret of the treble ‘E’ string (first string).
Step 2:
Now do everything in reverse i.e. go BACKWARDS from the 4th fret of the ‘E’ first string back to the open ‘E’ bass string, including the open strings.
Step 3:
Perform the same exercise with different right-hand fingerings i.e. i & a, m & a.
It is a left-hand exercise though so make sure you’re concentrating on the correct technique and are up on your fingertips and NOT the underside ‘pads’ of your fingers.
You can get a more advanced lesson as an extension of this technique all the way up the 12th fret of the first string which helps consolidate your skills. Indeed, here's the PDF of that lesson...
Classical Guitar Lessons - Chromatic Exercise
To watch that video, you can join the fr/ee Classical-Fingerstyle Portal right here...
https://www.learnclassicalguitar.com/Classical-Guitar-Fingerstyle-Portal

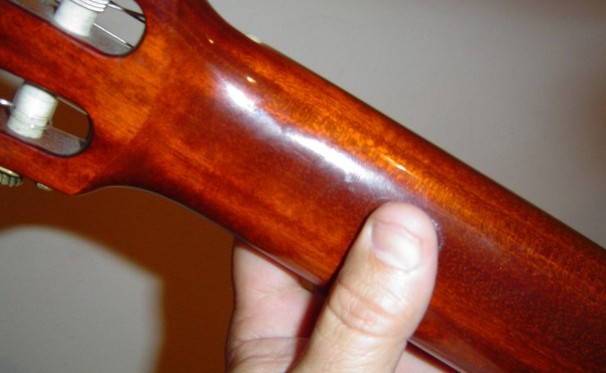
Classical Guitar Lessons - The Pivoting Thumb - The view from behind the neck...
The thumb actually acts as a pivot so that you can keep your balance when your wrist bends and your fingers stretch to reach around for more difficult finger positions, or chords, i.e., you just bend your wrist and your left-hand fingers can quickly reach from the 1st, E string right up to the 6th, E string quickly and easily.
Note: You can see the correct technique is to keep the thumb straight (but not rigid).
Classical Guitar Lessons - To sum up...
If you're conscientious about your technique, you should use the very tips of your fingers on the string as you push it down on the fret board.
You run the risk of the note not being correctly sounded If you use the "pads" of your fingers rather than the finger tips. Indeed, there is a very good chance the note will "buzz" or even be muted.
The muting is especially problematic for the strings under your finger i.e. the strings not being fingered but being slightly touched by the skin of your finger being used to play a note.
You can achieve this fingertip control by bending your knuckles at each joint as you attempt to play a note on the string.
If you looked side-on at the shape of your finger as it played a note it would look a little like the letter "C", only a little more "square".
Lastly, to achieve good left-hand guitar technique, you must finger the note on the fret board right next to the fret itself.
If you play too far away from the fret, you will tend to get a really annoying buzzing sound as you play the note.
If you play right on top of the fret you will tend to get a muting sound which is also not conducive to good music making.
Classical Guitar Lessons - Your First Pieces!
It's necessary to perform whole pieces, not simply drills, to achieve meaningful improvement. These three easy pieces are a good place to start with both video examples and in-line PDF files you can download:
Hush Little Baby is a classic song that helps you keep a steady beat. Click on the link to go there now...
Hush Little Baby practice guitar lesson...Ode to Joy by Beethoven is a simple tune with one line that helps you learn how to play with smooth tone and phrasing...
Ode to Joy by Beethoven practice guitar lesson...Yankee Doodle is a fun song that helps you improve finger independence and confidence...
Yankee Doodle practice guitar lesson...* Don't forget, you can get 7 other pieces on the Beginner Page when you click through on the 3 lessons above! Just scroll down past Yankee Doodle and you'll see them.
Classical Guitar Lessons - Playing an Arpeggio
I'm suggesting here to play an open string arpeggio. That means you don't have to use your left-hand fingers just yet. I also suggest using 'Tirando' for this task/drill...
Here's how it would perform it:
1. Use you thumb to play the open E sixth string (the thick one closest to your eyes)
2. Play the open G string (3rd) with your index finger
3. Play the open B (2nd) with your middle finger
4. Play the open E string (1st) with your ring finger
5. Play the open B (2nd) with your middle finger
6. Play the open G string (3rd) with your index finger
7. Play the open A (5th) with your middle finger
8. Play the open G string (3rd) with your ring finger
9. Play the open B string (2nd) with your thumb
10. Play the open E string (1st) with your index finger
11. Play the open B (2nd) with your middle finger
12. Play the open G string (3rd) with your ring finger
13. Play the open D (4th) with your middle finger
14. Play the open G string (3rd) with your ring finger
15. Play the open B string (2nd) with your thumb
16. Play the open E string (1st) with your index finger
17. Play the open B (2nd) with your middle finger
18. Play the open G string (3rd) with your ring finger
Repeat several times until you're playing it smoothly and in time.
Here's what it looks like in music notation and tab...
You can either print this or download it as well. Just look at the icons on the PDF scrolling app above. And here's a video on how to play an arpeggio properly...

And don't forget about joining the Portal (fr/ee) for more lessons and info...
https://www.learnclassicalguitar.com/Classical-Guitar-Fingerstyle-Portal

Here's a 2-Week Practice Plan for You!
Classical Guitar Lessons - Two Week Practice Plan
Here's a simple, 2-week, practice plan to help you stay on track:
First Week - Each Day
1. 2 minutes: examine your posture and relax
2. 5 minutes: 'Tirando and Apoyando stroke' practice on the first 3 strings (E string, B string and G string)
3. 5 minutes: pattern for open-string arpeggios
4. Hush Little Baby for 10 minutes
5. Ode to Joy for 10 minutes
Second Week - Each Day
1. 2 minutes: Examine your posture and relax
2. 5 minutes: Tirando and Apoyoand stroke practice on the first 3 strings (E string, B string and G string)
3. 10 minutes: Ode to Joy
4. 10 minutes: Hush, Little Baby
5. 10 minutes: Yankee Doodle
Advice: Always use a metronome. Only speed up when you can play neatly and comfortably.
What's next?
If and when you're ready for the next classes, you may go on to:

Click here for
'The Essential Collection'

Click here for
'The Eclectic Collection'

Click here for
'The Classical Guitar Gems Across the Ages'
Classical Guitar Lessons - Frequently Asked Questions...
How should I hold a classical guitar?
How should I hold a classical guitar?
Sit tall with the guitar on your left leg (if you’re right-handed). Use the Triangulation Technique with three points of contact with your body to keep the guitar stable and relaxed.
What is the Belly Button Approach?
What is the Belly Button Approach?
This means aligning the 18th fret of the guitar with your belly button. It ensures the guitar is centered and your arms can reach comfortably.
What are Tirando and Apoyando?
What are Tirando and Apoyando?
Tirando (free stroke) pulls the finger off the string without resting on the next one, giving a lighter sound. Apoyando (rest stroke) pushes through to rest on the next string, producing a fuller, singing tone.
How do I use my left-hand fingers correctly?
How do I use my left-hand fingers correctly?
Always play on the fingertips, not the pads. Keep fingers close to the fret, bend each joint, and place your thumb behind the neck for balance and reach.
What are some easy beginner classical guitar pieces?
What are some easy beginner classical guitar pieces?
Great starter pieces include Hush Little Baby, Ode to Joy, and Yankee Doodle. These help develop timing, phrasing, and finger independence.
More info on Classical Guitar...
LCG Navigation
Recent New Pages: